Activating Windows

Activating Windows

There are times when you may have had to reinstall Windows on your machine, or perhaps you work in a production environment where you receive a lot of machines that require reimaging before they can be used. After the install, you may find that Windows fails to activate.

You maybe thinking now; So, Windows hasn’t activated does that matter?
In a word, yes. It matters when Windows isn’t activated as it prevents a lot of customisation options that are present when the device is activated.
Some of the features that are disabled are; Dark mode, Start Menu customisation, Taskbar customisation, Desktop wallpaper cannot be changed, and you’ll be left with the ‘Activate Windows’ watermark in the bottom right corner of your Desktop.
Some of those things listed don’t really seem like that big of a deal. However, the main concern with not activating Windows is that you don’t receive all the major bug fixes and updates that are required to maintain device health and prevent any major bugs infecting your system.

Whilst that all sounds pretty scary, there are several ways in which you can activate Windows and make all of that go away. Initially, it could just be that your device needs to be rebooted and then Windows will connect with the authentication server and approve the license. Yes, it is a cliche but often times can work.

Alternatively, if you click on the Windows flag in the bottom-left corner of your screen and then either click the ‘gears’ icon near where it says power or you can type ‘settings’ and press enter which will take you to the settings menu.

Windows Settings Menu

At the settings menu, go to ‘Update & Security’. When you get there you need to click on the heading for ‘Activation’.

If you click on ‘Troubleshoot’ and run through the process, it will determine Windows isn’t active and give you a prompt to ‘Activate Windows’. Click on it, and it should communicate with the Windows Activation Server and authenticate the license.

Click Troubleshoot

Alternatively, Windows can be activated using a Powershell script. To create the script, you need to go to the Windows Start Menu and type ‘Powershell’ and select ‘Run ISE as Administrator’.

Run ISE as Administrator
See Full Script below.
$computer = gc env:computername
$key = (wmic path softwarelicensingservice get oa3xoriginalproductkey)[2].Trim() #Use .Trim() to remove the white space which otherwise causes the program to fail.
Write-Output $key

$service = get-wmiObject -query "select * from SoftwareLicensingService" -computername $computer
$service.InstallProductKey($key)
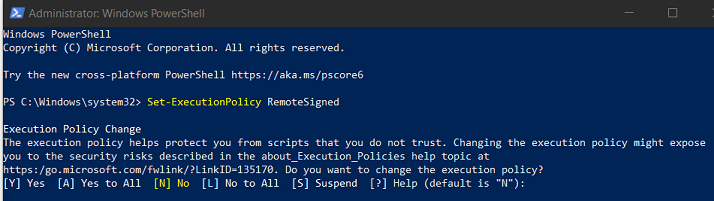
$service.RefreshLicenseStatus()

Enter the full script from above into Powershell ISE and then save it. To run the script, you may need to update the ‘Execution Policy’ on your machine. By default Powershell doesn’t allow you to run any ‘unauthorised’ scripts. So, open Powershell as an administrator and enter the following command; Set-ExecutionPolicy RemoteSigned.
When prompted select ‘Yes’, and now it should allow you to run the script.

Set-ExecutionPolicy RemoteSigned

Now, if you navigate to where you saved your script and run it as Administrator, it will activate windows for you and allow Windows to update to removing any security issues.

Learning to Code… Again…

Learning to Code… Again…

Photo by MOHI SYED on Pexels.com

In the last few weeks, I’ve been giving this a lot of thought and I’ve reached the conclusion that I want to learn how to write code… again. (It has been roughly seven months since I coded anything.)
Anybody who has read my blog in the past, will know that I’ve written quite a lot about Python over the years. In fact, I still use an automated Python Script everyday that I have saved on my Desktop. (If you’re interested in automating your Desktop and Applications using Python, click here).

For a while now, I’ve had an idea for App that I want to write. I’m not going to discuss the details of that now, there will be more on that as it develops.
Initially, for the first thirty days of this project I will be learning some Java and Kotlin, so that I can get a basis for creating the application. Hopefully, thirty days should be long enough for me to get an understanding of the syntax and at least make a start on creating something.
Over the next couple of weeks, I’ll post updates on any progress that is made on my journey with Java.

I haven’t yet come to a decision on the best editor I can use moving forward. I created my first Java program using Visual Studio Code which has Java development options. Please leave comments on the best Java editor and why.

Welcome, everybody!


The Perils of QR

The Perils of QR

A potential and unexpected new era of advertising emerged at this years Superbowl.
During the half time show there was an advert that peaked the curiousity of an entire nation.
20 million people scanned the QR code within a matter of minutes, navigating to the site and crashing the servers temporarily.

The advert consisted of some backing music, a black screen with a colour changing QR code every time it hit an edge of the screen. Similar to that of the DVD Player screensavers employeed a little over a decade ago.
If you haven’t seen the advert yet, you can see it below. The ad itself is a promotion for Coinbase, where new signups receive $15 worth of bitcoin, whilst already existing users received an opportunity to win $3 million in prizes.

Credit: Andrew Paulo

Looking at this from a marketing perspective, the person who had the idea for the advert is nothing short of genius and is likely being hailed as such due to the amount of traffic this is generating.
However, from a Cyber Security standpoint, this is an absolute disaster (We’ll learn why in just a few minutes. First off, where did QR codes come from?)
Quick Response codes or ‘QR codes’ as they are better known have been around since 1994. They were developed by a Japanese company and its main purpose was tracking vehicles during the manufacture process. They are very similar to the barcodes you see in every major supermarket. Although, they can hold considerably more data.

The advancements of Smart Phones coupled with hands-free approach of COVID increased the popularity of QR codes immensely during the pandemic. They could be used to pay for services or to ‘check-in’ at a variety of different venues under the UK Track and Trace Program.

So why is QR a Cyber Security nightmare?
Well, it isn’t difficult for hackers to spoof a QR code, which will take you to a website that looks very similar to the site you’re trying to visit and trick you into entering important information. Whether that is financial information, Date of Birth, Address. Anything that is personal to you is valuable to somebody looking to sell that data to the highest bidder.
In terms of threat level, the threat is greater than that of clicking on a dodgy link in an email. With a web URL you can usually see where it is that you are going. i.e. http://www.facebook.com. If the link in question said http://www.faceb00k.co.uk hopefully, you’d have some reservations about clicking on the link and inputting personal information. Last year, QR codes were often used in Phishing scams in an attempt to steal Office 365 credentials. The reason for this, is because a lot of Spam Filters employ URL scanners to determine whether a link is dodgy. This doesn’t cover QR codes.
Once upon a time scanning a QR code would automatically open the link. However, on Android and iOS devices, you now get a warning and a snippet of text underneath before it will allow you to proceed to the website.
The best practise for knowing whether or not it is safe to scan the code is to make note of where it originated. If you receive a dodgy email with a QR code included, then it most definitely won’t be safe to scan. However, if you are scanning the code from a product you have just purchased, chances are the manufacturer put it there and it is safe to follow that link.


What is DNS?

What is DNS?

Photo by panumas nikhomkhai on Pexels.com

In the past you may have seen errors, such as; ‘Unable to resolve to DNS’ or ‘DNS Server not responding’, but what do these actually mean?

To answer that, we first need to understand what DNS stands for and the role of DNS.

Domain Name System (DNS) resolves to an IP Address, it is a bit like the address book in your phone. You don’t know the phone number of everybody in your contacts but you do know the name of the person you wish to call. When you’re ready to call somebody, you open the address book and search for that contact by name and begin the call.
Easy, right?

However, DNS isn’t quite as simple as all that. When you type in your address. i.e. techtime.blog and press enter, a process then takes place to get you to that webpage.
A cache of previously visited websites is checked on your computer and within your browser to determine if you’ve been there before. If you have, the name resolves and the website loads.
If not, a query is sent out to a DNS Resolver. The cache on the resolver is checked and if the entry doesn’t exist on the DNS Resolver, the request is then forwarded to a Root Server.
A root server is the top-most level of the DNS structure. They delegate the request to the Top Level Domain servers. TLD Servers can handle requests for .net .org. .com etc.
The TLD knows the name of the website but not the IP Address, so the request is delegated to the Authorative Name Server which does know the IP Address. The AN Server is the last step in the DNS lookup process.
Once the IP address has been found, the information travels back up the chain to your computer and the page will load. The information is then cached on your machine to use next time.

Whilst that sounds really complicated and time consuming, a computer can complete that task in the time that it takes for you to blink.

Now that we know all this, lets go back to the beginning where we saw ‘DNS not responding. ‘ This can happen for several reasons, the most common one being that your device has lost its connection to the internet. Therefore, it will be unable to resolve DNS until the connection has been restored.
Alternatively, the DNS that your machine resolves to could be out of action.
Before trying anything on the device, switch off your Router and wait five minutes before switching back on. Once back on it should begin to work again. (Make sure you get permission if it isn’t your router)

If it doesn’t resolve, follow these steps:
To resolve, go to Control Panel > Network and Internet > Network Connections. (You need to be an administrator for this)
Right-Click on the Connection you use and select ‘Properties’. (This is going to be either Ethernet or Wireless).
Double-Click on ‘Internet Protocol Version 4 (TCP/IPv4). Depending on how you’re setup, they should be set to get IP and DNS automatically.
You’re going to want to select ‘Use the following DNS server addresses’, and then add 8.8.8.8 and underneath 8.8.4.4.
Click ‘Okay’ and then ‘Okay’ again. Now open a web browser and try to load a website. If it works, congratulations, you just resolved your DNS issue.

Network+ Exam

Network+ Exam

Hi everybody, bad news!
Yesterday, I failed my Network+ Exam by only scoring 622 points overall. In retrospect, it doesn’t feel like I failed by a whole lot.

The exam is scored on a scale of 100 – 900 points, with the passing mark being 720. The Network+ exam can consist of up to 90 questions, lasts for ninety minutes and is a mixture of practical scenarios and multiple choice questions.

I don’t have the exam booked yet for the second attempt. However, I’m going to study all the weak sections that I had, and hopefully, the second time around will get me the passing score.
The paper I received after completing the exam specifies the weak areas as Wireless and Authentication, so those are the areas I’m going to predominantly focus on.

Hopefully, next time I write a post like this will be a success post!
Good Luck to everybody else who is studying to sit an exam.

Terminal Commands in Ubuntu Linux

Terminal Commands in Ubuntu Linux

The Linux Terminal is a very powerful application and can be used to achieve just about anything.
I am going to run through some of the basic commands that you need to know, to get setup using Linux and on your way to becoming a command line master.
An important point to mention before we go any further with terminal commands is the use of ‘sudo’ or ‘root’ privileges. Sudo or root is required to run commands using elevated privileges. 
The Terminal has a manual built into it with entries for all commands. This includes a description of what the command does and how it can be used.
The manual page can be accessed by typing ‘man <name of command>’. So, to see the manual page for ‘sudo’, we would type, ‘man sudo’.

Manual Pages

For security reasons, it is important that your computer is regularly kept up to date with the latest updates. Now, we could do this through the Graphical User Interface (GUI) that can be accessed through ‘Ubuntu Software’, navigating across to the ‘Updates’ tab and installing all available updates. However, that is boring and slow.
Instead, let’s use the command ‘sudo apt-get update && sudo apt-get upgrade’. The ‘&&’ operator combines the two commands together and runs them one after the other. After running the command, the terminal will prompt for a password, and then require either a Y/N to confirm or deny the updates.

Update Command

Updates have now been completed. Now, I need to see which folders are in the Home Directory. To do this, we need to type ‘dir’, followed by pressing the Enter key on the keyboard.

dir command

Folder and files are case sensitive in Linux, so if we are searching for something specific, we need to ensure it is spelt exactly the same or it will ignore it.
I want to create a file in the ‘Documents’ folder. This can be done by typing ‘CD Documents’.

CD Documents

Using the ‘CD Documents’ command has opened that directory, however, I’m not sure if the file that I’m looking for is saved here or not. To find this out, I’m going to need to list everything that is in the Documents folder. Type the command ‘ls’. Short for ‘list’, this will show whether the file I’m looking for is there or not.

ls command

I was looking for the Python file labelled ‘file.py’, it was saved in this folder after all.
Now that the file has been found, I can continue working on it. By using the command ‘vim file.py’, I can work on the file in the terminal.

Vim file.py

To work on the file, press ‘I’ to put Vim into ‘insert’ mode, allowing changes to be made to the file. After making the changes to the document that needed to be made. Its time to save and exit. To exit Vim type, :wq!
This will save and quit Vim taking us back to the terminal window. Now that we have finished working in the terminal, type ‘exit’ to quit.

Working in Vim
Adjust Screen Resolution for an Ubuntu Hyper-V Virtual Machine

Adjust Screen Resolution for an Ubuntu Hyper-V Virtual Machine

For a while I’ve been using Ubuntu 20.10 as a machine that I setup to run in Hyper-V. However, the default screen resolution of a virtual machine package is 1024×768.
Whilst this is all well and good for short term use, it can become quite tiresome and cause considerable eye strain with long-term use.
Good News! With a few simple commands in the terminal, this setting can be changed to a more suitable resolution.
Firstly, open the terminal and enter the following command:

Sudo vim /etc/default/grub

Sudo or root privileges are required to run this, otherwise the grub file opens as Read-Only and cannot be changed. Press ‘i’, this will change vim to ‘insert’ mode and allow changes to be made.
There are two lines in the grub file that need to be updated for the resolution changes to take effect.
Locate ‘grub_cmdline_linux_default=’ and ‘grub_cmdline_linux=’. Once you have found those two lines, which are located directly next to each other; update the end of each entry to add “quiet splash video=hyperv_fb:1920×1080”.
Change the resolution at the end to meet your requirements.

“quiet splash video=hyperv_fb:1920×1080”

After updating the file, press ‘esc’ followed by ‘:wq!’ (without the quotation marks), this will close vim whilst writing and saving the changes.
To complete the changes to the file, it is now time to update grub. This can be done by using the command ‘sudo update-grub’.

sudo update-grub

All the necessary sections have been updated, next time the machine reboots, it will reboot with the new resolution in place.

Ubuntu VM after grub update
Using Lists in Python

Using Lists in Python

Why use lists in Python?
Lists are used in Python to assign multiple values to a single variable. Lists are one of four arrays that exist in Python, the other three are called ‘Sets’, ‘Tuples’ and ‘Dictionaries’. Lists are identified by their square brackets. The reason to use Lists is that they are mutable. This means that a list can be changed to include other items or that items can be removed from the list altogether. There are several functions that can be called upon to determine the length of a list, or to add/remove additional items which I will now discuss.

Lists

I have created a list of fruits. At the moment the list only contains three items, which isn’t very exciting. We’re going to add more content to this list by using the append() function.
Append() can only be used to add one item at a time, so to add more items we’d need to use append() several times.

Append()

The len() function can be used to determine how many items are in a list. Its possible that in a big project you would have multiple lists, so use the len() statement in a print function with the name of the list you wish to examine.

Len()

An important thing to remember, is that numbering in Python always starts at zero. This makes the first item in a list ‘zero’.
Whilst len() can report back on every item in a list, it can also be used to count the length of an individual item in a list. Using the print statement we used in the screenshot above, at the end of ‘fruits’ add in square brackets and the item in the list that you wish to count to return the length of that item in the string.

len(fruits[3])

If we were to run the code ‘print(len(fruits[3]), it would return the value ’10’. This is because ‘Strawberry’ is the fourth item on the list and consists of ten letters.
Lists are not limited to strings. Any data type can be called from a list, whether it be a string, integer, float or Boolean data type.

Data Types

Similar to how len() function works by printing the length of an individual item in a list, the string can be called in the reverse order by using [::-1] at the end of the list name in print operator.            

Reverse a string

This is just a brief example of some of the things that lists can do. The best way to learn more about lists is to practice using them in your code.

Challenges

  • Can you find how to insert items into the middle of a list?
  • Can you write a function to count how many times a single letter occurs in a list?
Which IDE/Text Editor for Python Development?

Which IDE/Text Editor for Python Development?

There are a number of great options available when it comes to programming anything in Python, or indeed any programming language.
If you are using a Windows machine for Python, you will no doubt have Idle installed as this is bundled in with the installer.
Idle offers many great features, in that it has a ‘code as you go’ area and type in basic programs to test out code. However, if you wanted to write more complex code, the option is there. Selecting File > new, opens a text editor similar to notepad with the added addition that any keywords are colour coded. 

Idle
Idle Text Editor

Whilst I would consider Idle great for beginners, there are Integrated Development Environments that exist to make workflow more seamless. For example, Visual Studio provides the ability to write Python code and upload it straight to Github. For larger projects, this can be incredibly helpful to update a project in seconds, instead of having to switch between multiple applications.
One of the downsides to working with Visual Studio is that Python functionality is not enabled by default. It must be added as an extension from the store.

Visual Studio

 Another example of a great IDE is PyCharm.
Pycharm is optimised for Python Development. Similar to Visual Studio, Pycharm has includes the Terminal and a Python console in one place so that the code can be run directly from the application. An addition to Pycharm is that when the application is opened it provides a ‘tip of the day’. The option exists to turn off the notifications, however, I have left it on as it is providing some useful tips that I can apply to my coding journey.

Pycharm

I have only been coding for about ten weeks, so this is a fairly limited review and doesn’t cover the full functionality and possibilities that these applications provide. It is also the reason; I am not including more examples within this blog post.
There is one more application that I have used briefly that I would like to make mention of, and that application is Vim within the Linux Terminal.
Vim has a steep learning curve and can be difficult to get grips with at first, however, with more use the easier it becomes.

Vim Editor

There are other IDE’s and text editors available. Be sure to do some research and find the one that works for you and makes your workflow just a little bit easier.